
DC Motor and Stepper Control
A motor needs far more current than an Arduino pin can give, so the board never drives it directly. It sends low-current control signals to a driver, which switches the motor's own supply. You use two drivers: an L298N H-bridge to set a DC motor's speed and direction, and a ULN2003 to turn a stepper motor by exact steps.
Objectives
- Explain why a motor needs a driver, and wire one with a shared ground.
- Set a DC motor's speed with PWM (
analogWrite()) and its direction with an H-bridge. - Read a number typed on the Serial Monitor and reject values out of range.
- Turn a stepper motor by a given angle with the
Stepperlibrary.
Before the lab
Finish Experiment 3. This experiment reuses analogWrite(), millis() and the Serial Monitor from it.
Background
Why a motor needs a driver
| Arduino pin | Small DC motor | 28BYJ-48 stepper | |
|---|---|---|---|
| Current | 20 mA, 40 mA max | 100–500 mA, more when starting | about 240 mA |
A motor connected straight to a pin would overload it, and the voltage spike a motor coil makes when switched off can destroy the chip. A driver takes the pin's signal as a command and switches the motor's own supply. Flyback diodes across its outputs absorb the spikes; both boards you use have them built in.
Shared ground
The motor supply and the Arduino must have their GND connected together. Without a common ground the driver cannot see the Arduino's signals, and the motor does nothing or twitches.
PWM: speed
analogWrite(pin, value) on a ~ pin does not output a voltage between 0 and 5 V. It switches the pin fully on and off about 490 times a second. The fraction of each period the pin is HIGH is the duty cycle:
duty = Ton / (Ton + Toff) = value / 255
value | 0 | 64 | 127 | 191 | 255 |
|---|---|---|---|---|---|
| Duty cycle | 0 % | 25 % | 50 % | 75 % | 100 % |
| Average voltage at 5 V | 0 V | 1.25 V | 2.5 V | 3.75 V | 5 V |
The motor is too slow to follow each pulse, so it responds to the average: higher duty, higher speed. Below some duty the motor only hums, because the average is too low to overcome friction. Example 2 finds that point.
If a value can leave the range 0–255, clamp it with constrain(x, 0, 255), or rescale it with map(x, fromLow, fromHigh, 0, 255).
The H-bridge: direction
A DC motor reverses when the current through it reverses. An H-bridge is four switches around the motor, shaped like an H. Closing one diagonal pair sends current one way; closing the other pair sends it back:
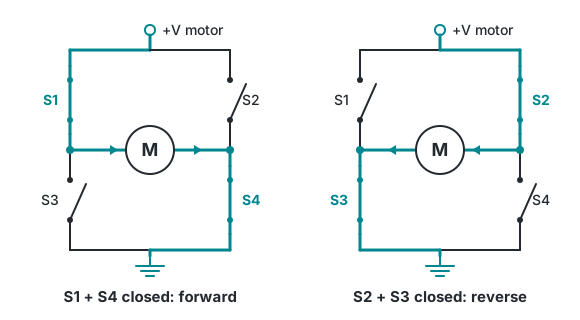
The L298N holds two H-bridges, A and B, so it can drive two motors. For motor A, IN1 and IN2 choose which pair closes, and ENA turns the bridge on. Put PWM on ENA and it sets the speed too:
ENA | IN1 | IN2 | Motor |
|---|---|---|---|
| PWM | HIGH | LOW | Forward, at the PWM speed |
| PWM | LOW | HIGH | Reverse, at the PWM speed |
| PWM | equal | equal | Brake: stops quickly |
| 0 | any | any | Coast: power off, spins down |
The ENA jumper
The L298N module ships with a jumper on ENA, which holds the bridge on at full speed. Pull the jumper off and wire ENA to a PWM pin, or analogWrite() changes nothing.
Stepper motors
A stepper does not spin freely. Its coils are energized one pattern at a time, and each new pattern pulls the rotor one step further. Count the steps and you know the angle, with no sensor.
The 28BYJ-48 has a gearbox, so one turn of its shaft takes 2048 steps (0.18° each). Its ULN2003 board is four transistor switches, one per coil, with an LED on each to show the pattern. The Stepper library, built into the Arduino IDE, sends the patterns for you:
| Function | Effect |
|---|---|
Stepper motor(2048, 8, 10, 9, 11) | A stepper on the board's IN1..IN4 = pins 8..11. Note the order: IN1, IN3, IN2, IN4. |
motor.setSpeed(rpm) | Speed for later moves; up to about 15 rpm for the 28BYJ-48 |
motor.step(n) | Move n steps; negative reverses. Blocks until done. |
To turn by an angle, convert it to steps: steps = angle × 2048 / 360. A move of n steps at rpm takes n × 60 / (2048 × rpm) seconds.
Reading a number from the Serial Monitor
Text typed in the Serial Monitor arrives one character at a time. With the line ending set to Newline, read a whole line and convert it:
if (Serial.available() > 0) {               // something has arrived
  String line = Serial.readStringUntil('\n');
  line.trim();                              // drop spaces and '\r'
  int value = line.toInt();                 // 0 if the text is not a number
  // ... check the range before you use it ...
}
toInt() returns 0 for text that is not a number, so test line == "0" if you need to tell a real 0 from bad input.
Materials
- Arduino Mega 2560 and USB cable
- L298N motor driver module
- Small 6 V DC motor
- 28BYJ-48 stepper motor with its ULN2003 driver board
- External supply for the DC motor, 6–9 V (battery pack or bench supply)
- Jumper wires
Examples
Example 1: forward, stop, reverse
Wire the L298N, with its ENA jumper removed:
| L298N | To |
|---|---|
ENA | Pin 10 |
IN1 | Pin 8 |
IN2 | Pin 9 |
OUT1, OUT2 | The motor's two leads |
12V | External supply + |
GND | External supply − and an Arduino GND |
// hbridge.ino: run a DC motor forward, stop, reverse, stop, through an L298N
// ENA on a PWM pin sets the speed, IN1/IN2 set the direction.

const int ENA = 10;   // PWM: speed
const int IN1 = 8;    // direction
const int IN2 = 9;

// speed from -255 (full reverse) through 0 (stop) to 255 (full forward)
void setMotor(int speed) {
  speed = constrain(speed, -255, 255);
  digitalWrite(IN1, speed > 0 ? HIGH : LOW);
  digitalWrite(IN2, speed < 0 ? HIGH : LOW);
  analogWrite(ENA, abs(speed));
}

void setup() {
  pinMode(ENA, OUTPUT);
  pinMode(IN1, OUTPUT);
  pinMode(IN2, OUTPUT);
  setMotor(0);
}

void loop() {
  setMotor(200);    // forward
  delay(2000);
  setMotor(0);      // stop
  delay(1000);
  setMotor(-200);   // reverse
  delay(2000);
  setMotor(0);
  delay(1000);
}
The motor runs one way for 2 s, stops, then runs the other way. setMotor() takes a signed speed and works out the three pins from it, so the rest of your code never touches IN1 and IN2 again. Reuse it in the lab work.
Which way is forward?
That depends only on which lead you put on OUT1. Swap the two motor leads and forward and reverse swap too.
Example 2: find the starting duty
Same wiring. Open the Serial Monitor at 9600 baud.
// ramp.ino: sweep the PWM value 0 -> 255 and print it, to find where the motor starts turning
// Same wiring as hbridge.ino.

const int ENA = 10;
const int IN1 = 8;
const int IN2 = 9;

void setup() {
  pinMode(ENA, OUTPUT);
  pinMode(IN1, OUTPUT);
  pinMode(IN2, OUTPUT);
  digitalWrite(IN1, HIGH);   // forward
  digitalWrite(IN2, LOW);
  Serial.begin(9600);
}

void loop() {
  for (int pwm = 0; pwm <= 255; pwm += 15) {
    analogWrite(ENA, pwm);
    Serial.print("PWM ");
    Serial.print(pwm);
    Serial.print("  duty ");
    Serial.print(pwm * 100L / 255);
    Serial.println(" %");
    delay(1000);
  }
  analogWrite(ENA, 0);
  delay(3000);
}
The PWM value climbs by 15 every second. Note the value at which the motor starts to turn: below it the motor only hums. Each motor is different, so your lab work should never ask for a speed below this.
Example 3: stepper, one turn each way
Plug the 28BYJ-48 into the ULN2003 board's socket, then wire the board:
| ULN2003 board | To |
|---|---|
IN1, IN2, IN3, IN4 | Pins 8, 9, 10, 11 |
+ (5–12 V) | Arduino 5V |
− | Arduino GND |
The DC motor circuit can stay on the breadboard, but unplug IN1 and IN2 of the L298N from pins 8 and 9.
// stepper.ino: one revolution clockwise, then one counterclockwise
// 28BYJ-48 stepper on a ULN2003 board: IN1..IN4 to pins 8..11.

#include <Stepper.h>

const int STEPS_PER_REV = 2048;   // 28BYJ-48 in full-step mode, after its gearbox

// Note the order 8, 10, 9, 11: the library wants IN1, IN3, IN2, IN4.
Stepper motor(STEPS_PER_REV, 8, 10, 9, 11);

void setup() {
  motor.setSpeed(10);   // rpm; the 28BYJ-48 tops out around 15
  Serial.begin(9600);
}

void loop() {
  Serial.println("clockwise");
  motor.step(STEPS_PER_REV);     // blocks until the revolution is done
  delay(500);

  Serial.println("counterclockwise");
  motor.step(-STEPS_PER_REV);
  delay(500);
}
The shaft makes exactly one turn, then turns back. The four LEDs on the board show the coil pattern; lower the speed to 1 rpm to watch them step.
Lab work
Each lab work starts from a sketch that already works except for a few lines marked TODO. Copy it into the IDE, fill in the TODOs, and upload.
Lab work 1: Serial speed control
Type a speed from −255 to 255 in the Serial Monitor and the motor runs at it: negative is reverse, 0 stops. Anything out of range prints an error and leaves the motor alone.
Keep the Example 1 circuit. Set the Serial Monitor's line ending to Newline.
// lab1-starter.ino: Lab work 1. Fill in the two TODOs.
// L298N wired as in Example 1. Serial Monitor at 9600 baud, line ending "Newline".

const int ENA = 10;
const int IN1 = 8;
const int IN2 = 9;

// setMotor() from Example 1: -255 full reverse, 0 stop, 255 full forward
void setMotor(int speed) {
  digitalWrite(IN1, speed > 0 ? HIGH : LOW);
  digitalWrite(IN2, speed < 0 ? HIGH : LOW);
  analogWrite(ENA, abs(speed));
}

void setup() {
  pinMode(ENA, OUTPUT);
  pinMode(IN1, OUTPUT);
  pinMode(IN2, OUTPUT);
  setMotor(0);
  Serial.begin(9600);
  Serial.println("Type a speed from -255 to 255:");
}

void loop() {
  if (Serial.available() > 0) {
    String line = Serial.readStringUntil('\n');
    line.trim();
    int speed = line.toInt();

    // TODO 1: if speed is from -255 to 255, call setMotor(speed) and print "Speed set to " and the speed
    // TODO 2: otherwise print "Out of range: use -255 to 255" and leave the motor as it is
  }
}
Hints
- TODO 1 and 2 are one
if/else. The condition isspeed >= -255 && speed <= 255. - Print the speed with
Serial.print("Speed set to ");thenSerial.println(speed); - Start with values above your motor's starting duty from Example 2, or it only hums.
Lab work 2: stepper by an angle
Type an angle in the Serial Monitor and the stepper shaft turns by that many degrees: 90 is a quarter turn, -90 turns back.
Keep the Example 3 circuit. Set the Serial Monitor's line ending to Newline.
// lab2-starter.ino: Lab work 2. Fill in the two TODOs.
// 28BYJ-48 on a ULN2003 board wired as in Example 3. Serial Monitor at 9600 baud, line ending "Newline".

#include <Stepper.h>

const int STEPS_PER_REV = 2048;
Stepper motor(STEPS_PER_REV, 8, 10, 9, 11);

void setup() {
  motor.setSpeed(10);
  Serial.begin(9600);
  Serial.println("Type an angle in degrees (negative turns the other way):");
}

void loop() {
  if (Serial.available() > 0) {
    String line = Serial.readStringUntil('\n');
    line.trim();
    int angle = line.toInt();

    long steps = 0;   // TODO 1: convert angle to steps
    // TODO 2: move the motor by that many steps

    Serial.print("Turned ");
    Serial.print(angle);
    Serial.println(" degrees");
  }
}
Hints
- TODO 1: one turn is 360° and 2048 steps, so
long steps = angle * 2048L / 360;. TheLstops the multiplication from overflowing anint. - TODO 2:
motor.step(steps); - Put a bit of tape on the shaft as a pointer, so you can see the angle.
Common problems
| Symptom | Cause and fix |
|---|---|
| The DC motor never turns | No common ground: join the supply's − to an Arduino GND. Or the supply is off. |
| The motor always runs at full speed | The ENA jumper is still on, or ENA is on a pin without ~. |
| The motor hums but does not turn | The PWM value is below the starting duty of Example 2, or the supply is too weak. |
| The motor turns slowly even at 255 | The L298N drops about 2 V. Use a supply about 2 V above the motor's rating. |
| The Arduino resets when the motor starts | The motor is powered from the Arduino. Give it the external supply. |
| The stepper vibrates but does not turn | The pin order is wrong. It must be Stepper(2048, 8, 10, 9, 11) for IN1..IN4 on 8..11. Or the speed is above about 15 rpm. |
| Buttons and Serial input are ignored while the stepper moves | step() blocks. Move in small chunks if you need to react mid-move. |
| Each Serial command takes a second to act | The Serial Monitor's line ending is No line ending, so readStringUntil('\n') waits for its 1 s timeout. Set it to Newline. |
Things to try
- Wire a second motor to bridge B (
ENB,IN3,IN4,OUT3,OUT4) and drive both, like a two-wheeled robot: same direction to go straight, opposite to spin. - Ramp speed changes smoothly with
millis()instead of jumping, so the motor never jerks. - Run the stepper in the manual's sequence: 5 rpm for 2 s, reverse for 3 s, 3 rpm for 4 s, stop for 2 s. Work out each step count from the time.
- Drive a DC motor with a single PN2222 transistor and a flyback diode (manual Part 1). It sets speed, but can it reverse?
- Add a brake command
bto Lab work 1:IN1andIN2bothHIGHwithENAat 255. - Make Lab work 2 absolute: keep the shaft's position in a variable, so typing
90twice turns only the first time.